Surviving the Canadian bush in June isn’t about finding a magic spray; it’s about a strategic mindset that outsmarts the wild.
- Insect behaviour is predictable. Understanding their lifecycle is your first line of defence.
- Your gear is a system. A single failure point, like the wrong tent mesh, compromises the entire shelter.
- True safety comes from knowledge—knowing when bear spray is superior to bells and why a paper map can be more reliable than a GPS.
Recommendation: Stop fearing the bugs and start preparing with intelligence. This guide provides the tactical knowledge you need.
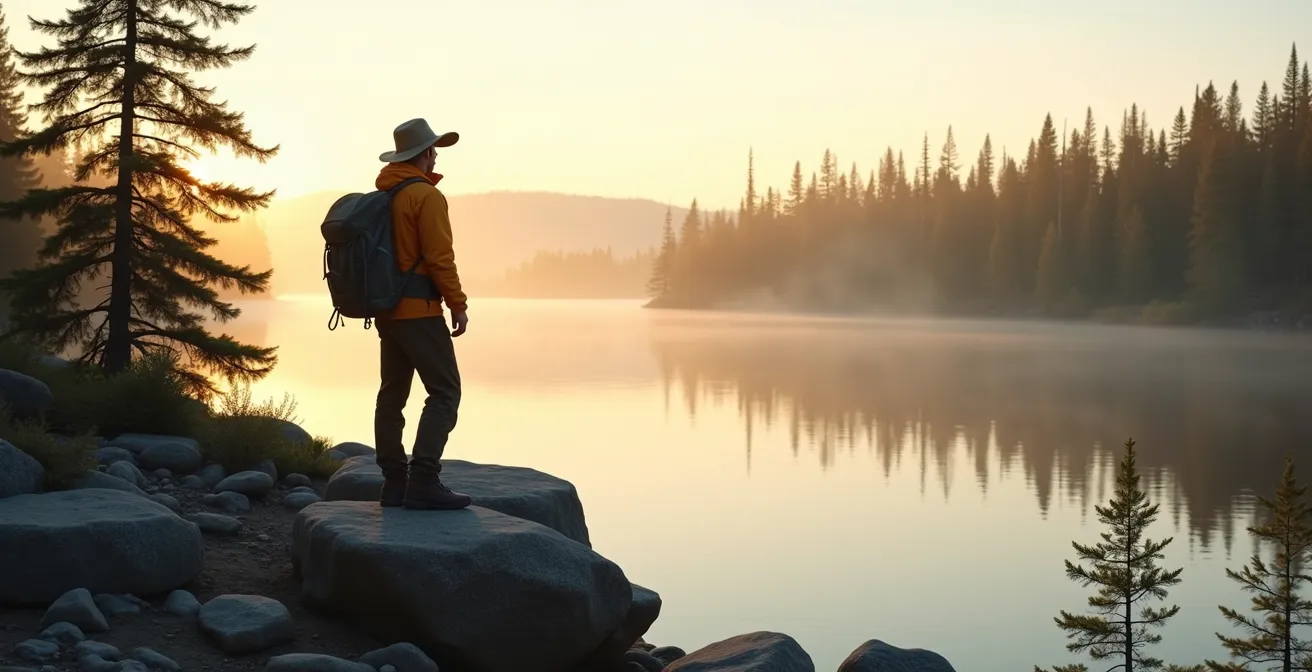
Listen up. That high-pitched whine buzzing past your ear isn’t just an annoyance; it’s the sound of the boreal forest testing you. Every year, eager campers head into the Canadian Shield dreaming of serene lakes and crackling fires, only to be driven mad by relentless swarms of black flies and mosquitoes. You’ve probably heard the usual advice: wear bug spray, cover up, and hope for the best. That’s a passive strategy, and in the bush, being passive gets you eaten alive—literally.
This isn’t about simply enduring. It’s about understanding the enemy and the environment. The key isn’t a better chemical, it’s better tactics. We’re going to move beyond the platitudes and talk about the hard realities: why your gear might fail, why common-sense safety is often wrong, and how to build a defensive system that actually works. We will dissect the strategic failures that turn a dream trip into a nightmare and equip you with the bushcraft knowledge to not only survive bug season but to dominate it.
This guide will break down the essential strategies for navigating the Canadian wilderness when it’s at its most hostile. We’ll cover everything from the predictable patterns of insect hell to the real-world effectiveness of your safety gear and the critical, often-overlooked, details of navigation and health.
Summary: A Tactical Manual for Camping the Canadian Shield in Bug Season
- Why June is the Worst Month for Camping in the Canadian Shield?
- Bear Bells vs. Bear Spray: Which One Actually Protects You in the Boreal Forest?
- GPS or Topo Maps: What to Trust When You Are 50 km into the Bush?
- The Mesh Mistake: Why Your Summer Tent Might Fail Against Northern No-See-Ums
- Campfire Bans: How to Cook Your Meals When Open Fire is Prohibited?
- Beaver Fever: Why You Must Filter Canadian Stream Water Despite It Looking Clear?
- Deer Flies and Mosquitoes: Why the Portage is the Buggiest Part of the Trip?
- Do You Need Extra Health Insurance for Backcountry Rescue in Canada?
Why June is the Worst Month for Camping in the Canadian Shield?
Let’s get one thing straight: timing is everything. Heading into the boreal forest in early summer without understanding the insect lifecycle is like walking into an ambush. June isn’t just “buggy”; it’s the month of a multi-front assault. The problem is not one type of insect, but a perfectly timed succession of them, creating a period of maximum misery. It starts with the black flies, which are not just annoying; their bites are painful and can swell up, causing allergic reactions in some people.
These aren’t random swarms. Black flies have a specific lifecycle. They emerge from the fast-flowing, oxygenated rivers and streams of the Shield as the water warms in the spring. Their peak activity coincides with late May and June, precisely when most people are eager for their first trip. Just as the black fly population begins to wane, the mosquitoes are hitting their peak numbers. They breed in the standing, stagnant water left over from the spring melt. So, you get a handover from one blood-sucking menace to the next, with a significant overlap in June where you face both simultaneously. This is the crux of the problem: a strategic, overlapping attack from different species.
Understanding this timeline is your first piece of intel. It allows you to plan your trip for a less intense period, like late August, or to prepare specifically for the type of assault you will face. Here’s a breakdown of what you’re up against:
- Mid-May: Black flies begin emerging from rivers and streams. This is the start of the season.
- Late May-June: Peak black fly season. They are most active at dawn and dusk, but on overcast, humid days, they can be relentless all day.
- Late June-July: Mosquitoes reach their peak numbers just as the black fly population starts to decline. This is often the worst overlap.
- July-August: Deer flies and horse flies, which are strong daytime fliers, become the dominant pests.
- Mid-August onward: The combination of cooler nights and dwindling breeding grounds causes a significant decline in all biting insects. This is your window of opportunity.
So, choosing to go in June isn’t a simple preference; it’s a conscious decision to enter the forest at its most hostile. If you must go, you do so with the full knowledge that you are heading into the heart of the storm, and your preparation must reflect that reality.
Bear Bells vs. Bear Spray: Which One Actually Protects You in the Boreal Forest?
The debate between bear bells and bear spray isn’t a matter of opinion; it’s a matter of life and death. The romantic notion of a tinkling bell warning bears of your approach is one of the most dangerous myths in the Canadian backcountry. The reality is that in many areas, particularly in parks with high human traffic like Algonquin, bears have become habituated to the sound. To them, a bear bell is just background noise—the dinner bell, not an alarm bell. They associate the sound with hikers, and by extension, with backpacks full of food.
Let’s look at the evidence, not the folklore. The goal is not to surprise a bear. The best deterrent is your own voice: talk, sing, and make your presence known. But when that fails and you’re in a close-quarters encounter, you need a tool that works. Field research is unequivocal on this point. According to Parks Canada, whose staff deal with human-bear encounters daily, proper use of bear spray has deterred aggressive bears in over 90% of cases. No other deterrent, including firearms, comes close to that success rate. It’s designed to be a non-lethal, last-resort tool that creates a cloud of atomized capsaicin, temporarily incapacitating the animal and giving you time to retreat.
This isn’t just a can of pepper spray. It’s a specific defensive tool, and you need to treat it as such. Here are the key insights from experts who have studied these encounters:
Insights from Parks Canada Field Research
Parks Canada’s comprehensive studies on bear behaviour highlight a critical distinction between defensive encounters (e.g., surprising a mother with cubs) and predatory behaviour. Their research shows that bears in popular parks often ignore bells completely due to habituation. The agency’s official recommendation is to carry bear spray in an immediately accessible holster—not in your backpack. They specify using a 225ml canister with 0.75%-1% capsaicin. Furthermore, they stress the importance of practicing deployment with an inert training canister and protecting the spray from extreme temperatures, as its effectiveness can be compromised if it’s too cold or old. As their own data suggests, it is a proven tool for managing human-bear encounters safely.
This image demonstrates the only correct way to carry this piece of equipment: on your hip or chest, never buried in your pack.
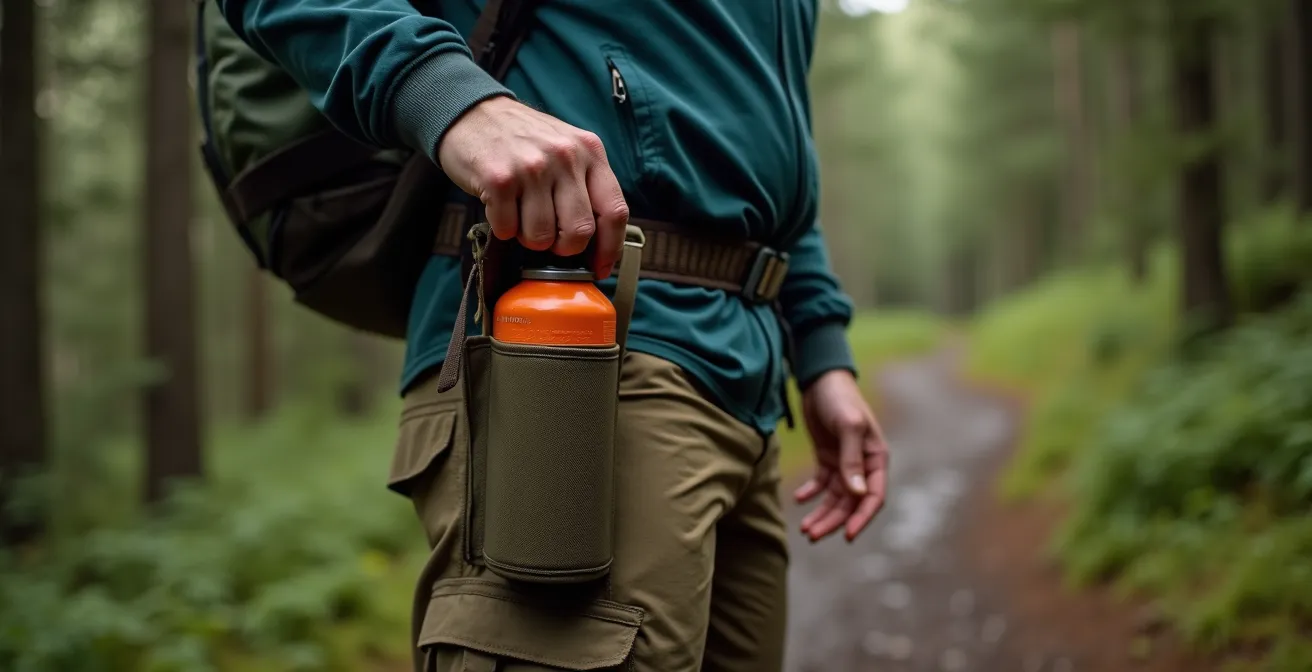
The canister must be instantly available. A bear can cover 50 yards in about three seconds. If your spray is in your pack, you don’t have a deterrent; you have a souvenir you’ll never get to use. The choice is clear: leave the bells at home and carry bear spray like you mean it.
Ultimately, a bell provides a false sense of security, which is more dangerous than no security at all. Bear spray, when carried and used correctly, provides a proven, effective last line of defence.
GPS or Topo Maps: What to Trust When You Are 50 km into the Bush?
Relying solely on a GPS unit deep in the boreal forest is a rookie mistake. It’s a fantastic tool, but it’s a fragile one. Batteries die, especially in the cold. Screens break. Most critically, the dense canopy of the Canadian Shield can, and will, block satellite signals, leaving you with a useless piece of plastic when you need it most. The belief that technology is infallible is a dangerous one out here. The guiding principle for deep-woods navigation is the redundancy protocol: never trust a single system.
A topographic map and a good baseplate compass are your lifeline. They don’t have batteries. They don’t lose signal. A paper map provides a level of detail that most consumer GPS units simply can’t match. It shows you the lay of the land: the swamps (muskeg), the steep ridges (eskers), the type of forest cover. This is critical ecological awareness that allows you to make strategic decisions, like choosing a campsite with good drainage and exposure to wind to minimize bugs, or identifying a high, dry route for a portage. A GPS tells you where you are; a map tells you what’s around you.
The professional approach is to use both systems in concert. Use the map for your primary navigation and strategic planning, and use the GPS to periodically confirm your precise location. This way, you are constantly practicing your map-and-compass skills, so if the electronics fail, you don’t miss a beat. The following table breaks down the hard realities of each system in a wilderness context:
This direct comparison, based on real-world conditions reported by organizations like Algonquin Park, highlights the critical need for a non-digital backup. A paper map is not a relic; it’s an essential piece of survival equipment.
| Factor | GPS Device | Topographic Map |
|---|---|---|
| Battery Life | 20-30 hours in cold conditions | Unlimited |
| Signal Reliability | Intermittent under dense canopy | Always available |
| Magnetic Interference | Not affected | Compass deviation near iron deposits |
| Detail Level | Basic terrain features | Shows muskeg, eskers, forest types |
| Weight | 200-400g with batteries | 50-100g per map |
The combination of a compass and a detailed map is a robust, reliable system that has been proven for centuries.
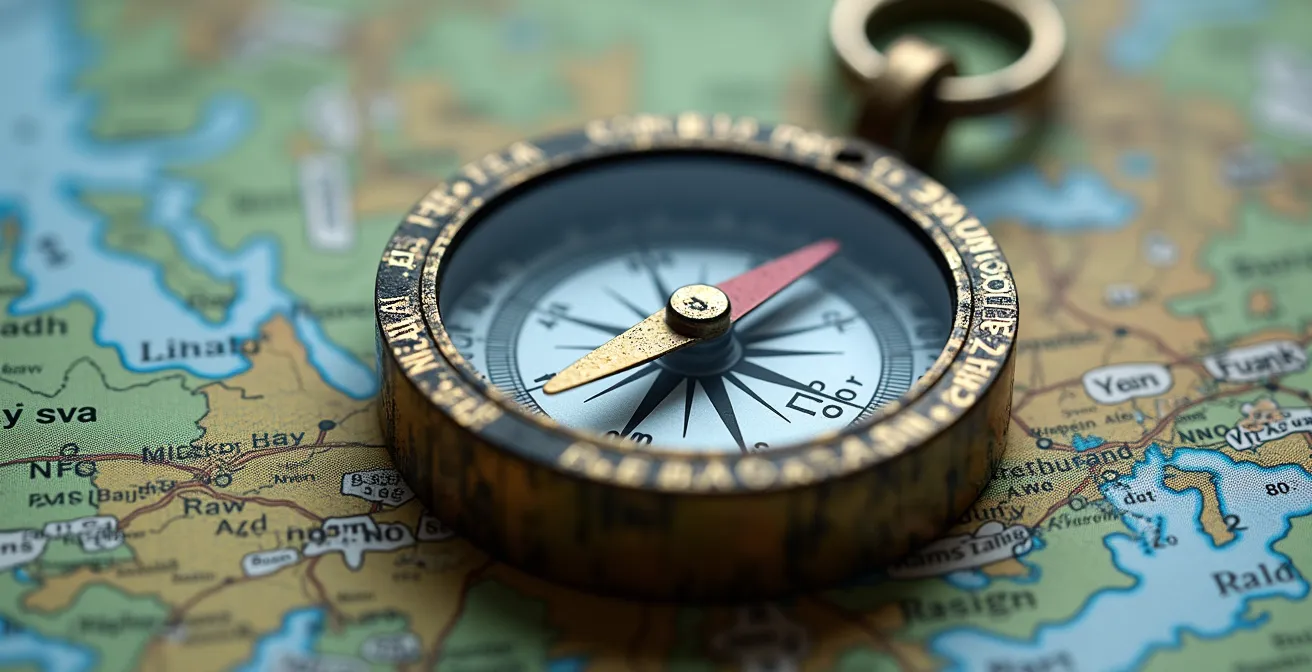
True navigation isn’t about following a blinking dot. It’s about reading the land. A map and compass force you to pay attention, to observe the contour of the hills and the direction of the streams. They connect you to the landscape in a way a screen never can.
Don’t be the person who gets lost because their batteries died. Learn to use a map and compass. Trust them. And carry the GPS as a convenient, but ultimately expendable, backup.
The Mesh Mistake: Why Your Summer Tent Might Fail Against Northern No-See-Ums
Your tent is not just a shelter from rain; in bug season, it’s your sanctuary, your last bastion against the swarms. But not all tents are created equal. A standard summer backpacking tent, even a high-quality one, can become a torture chamber in the Canadian north. The reason is simple and brutal: the mesh. Most tents are designed with mosquito netting, which is perfectly adequate for stopping mosquitoes. But it’s completely useless against the two most insidious northern pests: black flies and no-see-ums (punkies).
These insects are significantly smaller than mosquitoes and can crawl right through standard mesh. You’ll wake up covered in bites inside a fully zipped tent, wondering how they got in. The only defence is “no-see-um” grade mesh, which has a much finer weave. As a rule of thumb, standard mosquito mesh has around 600 holes per square inch; proper no-see-um mesh has 1200 or more. This is a non-negotiable feature for any shelter you plan to use in the boreal forest from May to August.
This principle of “Gear System Integrity” extends beyond the tent walls. Every potential entry point must be sealed. Zippers can have small gaps. Vents in your rain jacket hood might use the wrong mesh. As the renowned Canadian outdoorsman Kevin Callan points out, even the colour of the mesh matters for visibility and function.
Blackflies and those nasty ‘punkies’ will get in a mosquito net. Make sure it’s black mesh as well—you can see out better.
– Kevin Callan, The Happy Camper, Explore Magazine
Your pre-trip preparation must involve a meticulous inspection of your entire gear system. You are looking for any and every point of failure, because the bugs will find them. Treating your outer clothing and tent fly with Permethrin adds another critical layer of defence, creating a chemical barrier that kills or repels insects on contact.
Your Pre-Trip Gear Inspection Checklist for Bug Protection
- Check all tent zippers for gaps – run a credit card along closed zippers to find openings.
- Verify mesh type: no-see-um mesh has 1200+ holes per square inch vs. 600 for mosquito mesh. If the specs aren’t listed, assume it’s inadequate.
- Inspect tent floor seams with a flashlight from inside during daylight. Look for pinholes of light.
- Test rain jacket ventilation hoods and bug jacket mesh. If it’s too open, consider sealing vents with gear tape for the trip.
- Apply Permethrin treatment to your tent fly, outer clothing, and backpack 48 hours before departure, allowing it to dry completely.
- Pack mesh repair patches and a tube of seam sealer for inevitable field repairs.
Don’t assume your gear is sufficient. Verify it. Your physical and mental well-being on the trip depends on having a sealed, bug-free space to retreat to.
Campfire Bans: How to Cook Your Meals When Open Fire is Prohibited?
The image of a crackling campfire is central to the romance of camping, but in the Canadian Shield, it’s a luxury you can’t count on. From late spring through summer, dry conditions frequently lead to regional fire bans. A ban isn’t a suggestion; it’s the law. Violating it can lead to massive fines and, more importantly, you could be the person who starts a devastating forest fire. A responsible woodsman relies on skill, not flame. This means you must have a reliable, non-fire method for cooking.
Your primary tool becomes a modern camp stove. But not all stoves are created equal. You need a stove that is dependable, efficient, and appropriate for backcountry travel. The two main categories are canister stoves and liquid fuel stoves. Canister stoves (using isobutane/propane) are clean, easy to use, and lightweight. However, their performance can degrade significantly in cold temperatures. Liquid fuel stoves (using white gas) are more robust, perform better in the cold, and are more cost-effective over the long run, but they require priming and more maintenance.
For the serious boreal traveler, a liquid fuel stove like an MSR WhisperLite or similar is the gold standard. It’s a field-maintainable workhorse. Regardless of your choice, you must know how to use it, clean it, and troubleshoot it before you’re 50 km from the nearest road. Your cooking strategy must also adapt. Forget complex meals. Think efficient, one-pot dinners. Dehydrated meals, pasta, rice, and couscous are excellent staples. The goal is to maximize calories while minimizing fuel consumption and cleanup. A good system involves bringing water to a boil, adding your food, and then letting it sit in an insulated pot cozy to finish cooking without using more fuel.
Always carry more fuel than you think you’ll need. A good rule of thumb is about 100ml of white gas per person, per day, as a conservative estimate. This gives you a buffer for bad weather, spills, or the need to boil extra water for purification. Cooking during a fire ban isn’t a downgrade; it’s a test of your efficiency and preparedness. It’s a different discipline, one focused on speed, reliability, and leaving no trace.
Embrace the challenge. A quiet stove under the stars has its own kind of magic, one that’s built on competence and respect for the forest.
Beaver Fever: Why You Must Filter Canadian Stream Water Despite It Looking Clear?
That crystal-clear, cold stream cascading over granite rocks looks like the definition of pure. It’s tempting, especially after a long portage, to dip your bottle and drink. This is one of the most dangerous mistakes you can make in the Canadian bush. That pristine-looking water is very likely contaminated with microscopic parasites, the most notorious of which is Giardia lamblia, the protozoan that causes Giardiasis, or “Beaver Fever.”
The name is no accident. Beavers, along with muskrats, otters, and other mammals, are common carriers of Giardia. They defecate in or near the water, releasing cysts into the ecosystem. These cysts are incredibly hardy and can survive for months in cold water. When you ingest them, they hatch in your intestines, causing debilitating symptoms like explosive diarrhea, gas, stomach cramps, and nausea. Symptoms can take one to two weeks to appear, meaning you might be long out of the woods before it hits, but it will ruin your life for weeks afterward. The water is a living ecosystem, and you must assume every single drop of surface water is contaminated.
There is no excuse for not treating your water. You have several reliable options, and a serious traveler should carry at least two (redundancy protocol again).
- Boiling: Bringing water to a rolling boil for at least one minute is the most foolproof method. It kills all pathogens. However, it’s time-consuming and uses a lot of fuel.
- Pump or Gravity Filters: A quality filter with a pore size of 0.2 microns or smaller will physically remove bacteria and protozoa like Giardia. This is the most popular method. They provide good-tasting water instantly.
- Chemical Treatment: Iodine or chlorine dioxide tablets/drops are lightweight and effective, but they take time to work (up to 4 hours for chlorine dioxide in cold water) and can leave an unpleasant taste.
- UV Purifiers: Devices like the SteriPEN use ultraviolet light to scramble the DNA of pathogens. They are fast and lightweight, but rely on batteries and clear water to be effective.
Do not drink “straight from the middle of the lake.” Do not trust “fast-flowing” water. These are myths that will get you sick. Every time you fill your water bottle, it must be treated. No exceptions. This is a rigid discipline that protects your health and ensures your trip isn’t cut short by a debilitating illness.
Respect the water. Filter it, purify it, or boil it. Every single time.
Deer Flies and Mosquitoes: Why the Portage is the Buggiest Part of the Trip?
If you’ve ever done a portage in the Canadian Shield, you know the feeling. The moment you hoist the canoe onto your shoulders and step into the woods, they descend. The air becomes thick with a whining, biting cloud. The portage trail is, without fail, the buggiest part of any canoe trip. This isn’t just bad luck; it’s a convergence of factors that creates the perfect hunting ground for insects. It’s what you could call a “bug front.”
First, consider the terrain. Portages are connectors. They often cut through low-lying, damp areas between lakes. These are sheltered from the wind that would otherwise keep insects at bay on the open water. The ground is often boggy, creating ideal breeding grounds for mosquitoes. The dense foliage provides shade and humidity, which biting flies love. You are essentially walking through their prime habitat.
Second, consider your own physiology. Portaging is hard work. Your heart rate and respiration increase dramatically. You are exhaling a massive plume of carbon dioxide (CO2), which is the primary signal that mosquitoes and other biting insects use to locate a warm-blooded meal. You are also sweating, and your body temperature is elevated. This heat signature, combined with the chemical compounds in your sweat, makes you light up like a beacon on their radar. You’ve gone from being a small target in a canoe to a large, slow-moving, CO2-billowing buffet.
Deer flies and horse flies are particularly bad on portages. These are strong, visual hunters that are attracted to motion and dark colours. The dark shape of a canoe moving through the dappled light of the forest is an irresistible target. This is why a light-coloured hat can sometimes offer a small measure of protection. The only real defence on the portage is a full one: a bug jacket with a head net, long pants, and a steady, relentless pace. Don’t stop. Don’t swat. Just endure and keep moving. The moment you drop the canoe at the other end and get back on the water, the wind will be your salvation.
The portage is a test of will. Prepare for it, move through it efficiently, and know that relief is waiting on the open water.
Key Takeaways
- Your biggest enemies are predictable; use the insect lifecycle calendar to your advantage by planning trips for late August or preparing for the specific threats of June.
- Safety gear is not about opinion. Bear spray is statistically proven to be the most effective deterrent; leave the bells at home.
- Always maintain a redundancy protocol for critical systems. A paper map and compass are not optional backups; they are your primary navigation lifeline.
Do You Need Extra Health Insurance for Backcountry Rescue in Canada?
This is the question nobody asks until it’s too late. You’re deep in the bush, you’ve broken an ankle or gashed your leg with an axe, and you need to get out. You hit the SOS button on your satellite messenger. A helicopter is dispatched. You’re rescued. And a few weeks later, you get a bill for $5,000. The hard truth is that while a hospital visit in Canada is covered by provincial health care (like OHIP in Ontario), the cost of the ambulance or air ambulance that gets you there is not. Wilderness rescue is not free.
This is a critical financial risk that most backcountry travelers ignore. Provincial plans cover a nominal fee, often less than a hundred dollars, for ground ambulance services. The rest is on you. For an air ambulance, the costs can be astronomical, easily running into the tens of thousands of dollars depending on the location and complexity of the rescue. Your personal car insurance or homeowner’s policy will not cover this. You are personally liable for the full amount.
So, do you need extra insurance? The answer is an unequivocal yes. You must have a plan in place to cover emergency evacuation. There are several options. Many travel insurance plans, even those for travel within Canada, offer riders or specific policies that cover emergency medical evacuation. You must read the fine print to ensure it explicitly covers wilderness or “backcountry” scenarios and that the coverage limit is adequate.
Another option is a membership with an organization that provides rescue insurance. The American Alpine Club, for example, offers membership to Canadians, and their benefits include a significant amount of coverage for rescue expenses worldwide. Some private satellite rescue services, like Garmin’s IERCC, offer supplemental insurance plans. Failing to plan for this is not just irresponsible; it’s a gamble with your financial future. A single moment of bad luck shouldn’t lead to bankruptcy.
Before you step onto the trail, ensure you have a policy in place. It’s the last, and perhaps most important, piece of gear in your pack.